Online Jewelry Training Classes for Metalsmiths

Firstly, this paper explains the principles of pavé setting. It is not by any means a tutorial on how to learn pavé setting.
The word pavé (pronounced as ‘pa vay') came from the French word ‘Pavé' which means pavement. ( as in cobble stones next to each other)
Pavé setting is a setting method in which the surface of a jewelry item appears to be covered with tiny diamonds.
These diamonds are placed in small holes that have been drilled out on the surface of a jewelry item.
Generally spoken, stones are positioned as close together as possible sometimes in a line and sometimes in a honeycomb pattern.
The use of multiple stones in pave setting sometimes forms an illusion of a larger stone.
Usually, this setting is combined with prong or bezel settings that hold the larger (center) stone.
Visually, this type of setting gives best results with diamonds and white gold, but of course can be used with any suitable metal.
The object of pavé setting is to use the least amount of metal to hold the gemstone securely in place.
Faceted stones, sometimes cabochon stones and half pearls are held in by what are called beads.
A bead is a spur like projection raised with a graver and positioned around the girdle of the stone.
These small handmade claws, triangular in shape, hold the stones low and very close so that they produce a carpet of brilliance across the entire surface of the jewelry item.
The small handmade claws are pushed back onto the stone using a beading tool and are then called beads.
Normally, pavé setting is done with smaller gemstones from 0.5 mm to 4 mm in diameter.
Also, 99% of pavé set stones are round.
Traditionally, pavé setting is done with a hand or electrically powered drill machine, a graver and a beading tool.
The graver, which is essentially a small chisel, is manipulated by hand.
Modern technology has also crept into the traditional method of pavé setting and these days air powered graving machines are available for the small workshop.

These machines have become quite affordable, retailing at about $1000.00 at the time of writing. A Graver Max pneumatic graving machine. This machine require compressed air to operate, so a compressor is also needed.
Another result of modern technology is the use of computer aided manufacture to make a ring in wax first and then cast into metal.
The definition is so good that faux beads can be milled out of the wax on a ring.
When the ring is cast the beads are a very close approximation to the real thing and the layman cannot easily determine whether the beads were hand raised or machine made.
In the majority of pavé settings, a very small hole is drilled in the metal for the stone to sit in, and small beads of metal are pushed and raised around each stone one by one, to serve as prongs and hold each stone securely in place.
Micro-pavé (or micro-setting) uses smaller stones than traditional pavé, and is a relatively modern technique.
The technique is best described as the highly precise setting of very small diamonds using a microscope.
It came of age around the early seventies, when cutters perfected their cutting technology so that stones could more easily be cut in uniform sizes ranging from 0.5 mm to 1.2 mm in diameter, with the full complement of 57 facets on the stone.
Typically micro-pavé will feature rows of small diamonds no larger than 1.2 mm in diameter.
The tiny diamonds are set directly into solid metal as opposed to being set into a pre-drilled hole.
Therefore the underside of the jewelry piece is smooth and solid.
Mostly, stones are set close together and tightly woven with no separation between each row.
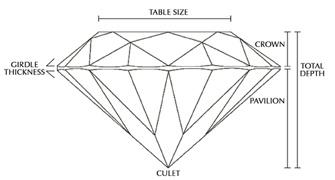
When setting gemstones it is good to be familiar with gem terminology.
This diagram shows the different facet names of a typical gemstone.
All setting work is dependent on the diameter of the stone, with the depth of the stone being a factor as well.
To learn how to set pavé setting from books and videos is very difficult, because the nuances of graver sharpening, hand pressure, angle of cutting and all the other myriad components that make for a well set gem will not be apparent to a rank beginner.
However, an experienced mentor or teacher needs only a glance at the student to see what is being done wrong, and the advice that he or she receives can be the difference between hours of frustration, or minutes of success.

That said, there is absolutely nothing wrong with experimenting with your own stones and metal.
It might take a lot of practice and patience to get a feel for pavé setting but in the end, once the technique has been learned, a large vista of beautiful designs open up.


Copper and aluminium are perfect metals to practice with.
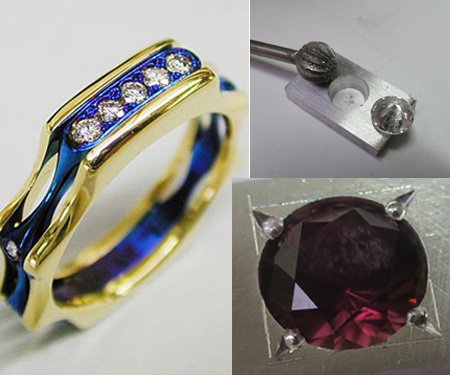
Here I have drilled a hole into the metal.
Generally spoken, the hole goes through the metal, leaving the bottom of the set stone open.
The only reason to have the bottom of the stone exposed, is to facilitate cleaning.
For this demonstration, I am using a 6.5 mm stone, which is larger than normal because it is easier to photograph.


The second step is to expand the hole until the stone fits into it.
Here I use a ball frazer.
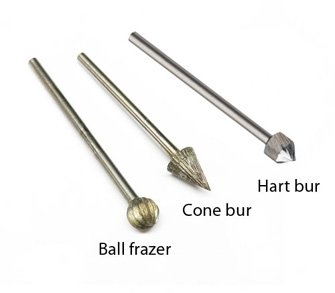

Other shaped burrs that can be used are cone shaped and hart / setting burrs.


The hole is expanded until the table of the stone lies about level with the top surface of the metal.
I say about, because different stones have different crown heights, different girdle thicknesses or different pavilion angles. These all reflect on how deep the stone is set in relation to the metal surface.


I'm using a colored stone for visibility.
Once the stone is at the desired height, a graver is used to raise a bead of metal.
The bead is raised in much the same way that a wood chisel raises a curl of wood when it is used.
Normally the stone would be in the hole when the bead is being raised, but for photographic purposes I have left the stone out to show what the bead looks like when it is being raised.
Were the stone being set, the next bead would be raised on the opposite side making sure that the stone remains level.
Then the third and fourth beads are also raised.


This is the shape of the graver that I have used for this stone.
It is a square graver with the front and sides polished to a bright mirror finish.
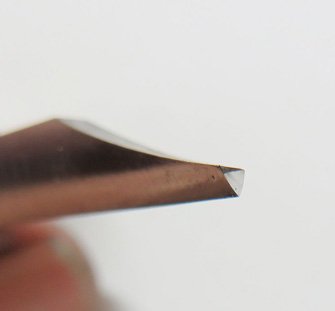

This is also a graver shape that is commonly used.
It is called an onglette shape and comes in various profiles, from broad to narrow, designated by numbers.
No 1 being narrow and No 5 being wide.
The one shown in the picture is a No. 4, which is my favorite general purpose graver for setting.
There are many different shapes, and I will only touch on them briefly.


These are the most common shapes.
a) small pointed (onglette) graver.
b) wider pointed graver
c) knife graver
d) facet graver
e) oval graver
f) flat graver with wide rib
g) flat graver with small rib
h) rounded grave
i) rounded graver with small rib
j) line graver
Img credit : Brepohl


This picture shows what the claws look like when they have been raised.
Now they need to be pushed back onto the stone, using a beading tool.


A beading tool is a piece of hardened steel that has a concave indentation at the tip.
As the raised bead is pushed towards the stone, the concave shape at the tip forces the bead into a rounded shape.
This serves two purposes.
One, to smooth the surface to prevent snagging on cloth and the other, to tighten the stone into its seat.
Beading tools also come in different sizes, No 1 being the smallest and No 15 being the largest.
Great care must be used with this tool, because it is very easy to slip and damage the surface of the stone.

The beading tool that was used to form the beads on the sample.
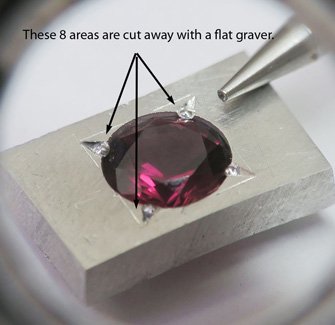
Now a flat graver is used to tidy up the edges and make the drilled circle square.
The picture below show the areas cut away before the stone is actually set.
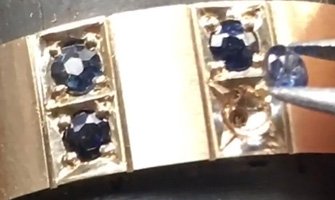

Here is an example of some sapphires being set after the bed has been cut square.


It requires a large amount of practice to sharpen a graver properly, never mind using it correctly and it is not the purpose of this paper to explain each and every method.
Most jewelry is sent off to professional setters for the gemstones to be pavé set.
Shown in the picture is the preparation of a medallion that is to be set with gemstones.
The enlarged sections are shown in the picture below.


This shows the incredible skills of the professional setter.
The seat of the stone has been prepared and the arrows show where the graver will come in to raise the beads.


Once the stone is set and the beads are raised, they are then made round with a beading tool.
Since there is decoration on the other side of the medallion, the holes are known a 'blind holes'.
When setting like this is done, the medallion will be completely finished off, and the stones will be perfectly clean.
Once they are set, all that needs to be done is for the piece to be placed into an ultrasonic cleaner for cleaning.
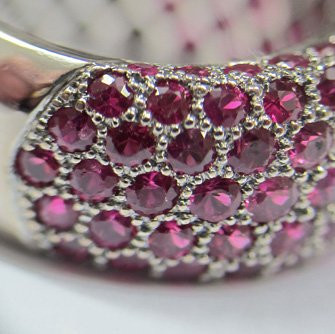

Here is an antique ring and a fine example of the beads both being decorative and serving to hold the rubies in.
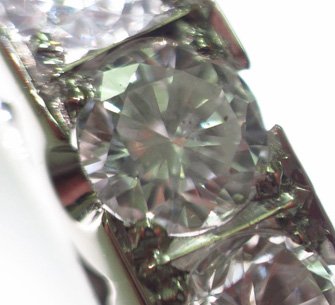

Here is another example of a diamond being held in place with the minimum of metal covering the stone, which is the primary purpose of pavé setting.
The ring circa 1950.
This is only an overview of the principles of pavé setting and not by any means a comprehensive how-to pavé tutorial.
Recommended Training for Setters:
This is a list of a few training centers with courses in gemstone setting
(these links were operative at the time of publishing).
Jura Training Center - Netherlands
Alexandre School Stone Setting Course - Belgium
GRS Training Center - USA
Stuller Stone Setting Training - USA
Jewelry examples with pavé setting.
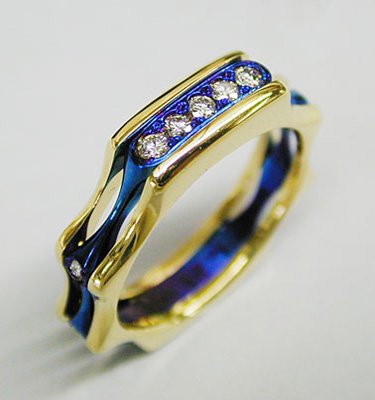
Here diamonds have been set into heat blued titanium.

Dolphin Brooch made and set by Hans Meevis.
I hope this overview inspires you to start your first step towards pavé bead setting.
It is a worthwhile arsenal to have in your toolbox, as it opens so many design avenues.
Click the link to receive your free PDF version on Pavé Bead Setting Techniques which will be emailed to you within 4 - 12 hours.
or select other projects from Jewelry Making Tutorials List
If you have any questions or wish to be notified of any new tutorials that are posted, email me.
This content is the intellectual property of Hans Meevis. More information on our Copyright and Privacy Policy


