Online Jewelry Training Classes for Metalsmiths

Many jewelry designs use square prong diamond encrusted bands to enhance the ring design. Some of my tutorials involve prong (claw) settings, so I made this free micro square prong making and setting tutorial as an overview to help my students practice setting skills and complete their projects more easily.
This free tutorial follows the same format as all my other free and premium tutorials. This gives you a good insight into the technical teaching methodology.


Here I am going to make micro square prongs / claws on a straight test piece of metal that is 4 mm wide and 3.5 mm thick and I am going to set 3 mm stones .
First I scribe a center line with my divider.

Determining how far apart the stones must be
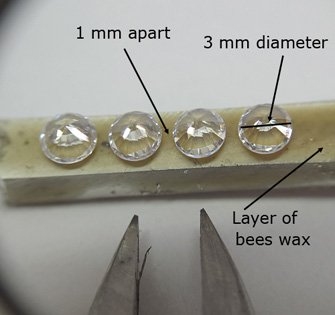
No matter what size stones are being set, it is always good practice to set them upside down on the metal and measure the culet to culet distance.
I melt a layer of bees wax to hold them in place.
I leave a distance of about 1 mm between the girdles of the stones and once everything is nice and straight, I measure the distance of the culet tips with my dividers.
The distance between the girdles will vary between larger and smaller stones, but 1 mm for 3 mm stones is about right.


A Little Side Note
Sometimes the stones are graduated, and then using your dividers doesn't work so easy.
Then it is easier to melt the wax on and position your stones as is shown.
Then take your saw with a fine blade and make a cut between each stone.
( In this example, the stones are 2 mm and 1.7 mm in diameter and I used a 6/0 blade to make the cuts)


Then, when the stones and wax are removed, the center for drilling your hole can easily be determined.

Back to the Tutorial
I then 'walk' the divider
down my center line and punch indentations on the divider marks so that my drill bit will not 'wander' when I start drilling.


I drill the holes with a 1 mm drill bit first and then expand it to 1.5 mm .
The Drill-Str8 is a device that easily integrates into your jewelers bench top drilling system allowing you to instantly transform you flex shaft hanging motor into a rigid and accurate miniature drill press and back again to normal flex shaft operations in three seconds.


One thing to remember to do is to finish off the holes at the bottom of the piece.
I use a small ball frazer to countersink the exit hole of the drill.
Just makes for a neater setting job.


I lightly scribe a guide line with my divider so that I know how far to cut my square claws down.
( I emphasized the line because it was not clear in the photograph.)


Then I cut in the middle of the drilled holes down to the guide line.
I use a 3/0 saw blade.
( see the bottom of this tutorial for the saw blade designations.)


Then I cut with the same saw blade in between the drilled holes down to the guide line.


Then I fraze with a 0.7 mm barrel frazer ( also known as a cylinder burr) on the center saw line down to my guide line.
I do the one side first, and then turn the piece around and do the other side.
The reason is that although the saw cut will guide the barrel burr, it still tends to 'roll' with it's rotation.
Turning the piece around and then doing the other side compensates for this.


Here both sides have been done.


I then expand the 0.7 mm groove using a 1 mm frazer.


Side view.


Then I use my 0.7 frazer and start forming the center line groove.
I start from the left side and the once I reach the end of the collet row, I start from the right side.


The end of the collet row is done as is shown in the picture.
Care must be taken to cut only the claws, not the end part.


Here all the collets have been cut with the 0.7 mm frazer.


Then a 1 mm frazer is used to expand the middle groove and then a 1.2 mm frazer is used to finish the final width of the center.
The reason I use incrementally larger frazers is because it tends to be more accurate, and should there be a slightly skew line, the next size frazer up can be used to 'nudge' the line straight.


Then the 1,2 mm frazer is also used to expand the center of the collets.
The claws should now be more or less square in shape.


Setting the stones.
The claws are bent apart using a wedge shaped pusher that I make out of a 3 mm brass rod and file to shape.
The pusher is rocked back and forth and then forces the claws apart with minimal damage.


I regard these tools as expendable, and I file the tip shape as I need it for any particular job.
This tip was filed into this shape just for this tutorial.


Here the claws are bent apart and now a setting burr can be used to cut the claws.


Because I am setting 3 mm stones, I use a 2.5 mm setting burr to cut the claws.
The claws must be cut not to deep and not to shallow.
If they are cut too shallow, then when they are bent back towards the stone, they will stand proud from the sides of the piece.
If they are cut to deep they will 'sink' in towards the stone and look hunched over.


I prefer to use the fine toothed burr because it is less likely too hook on the claws.

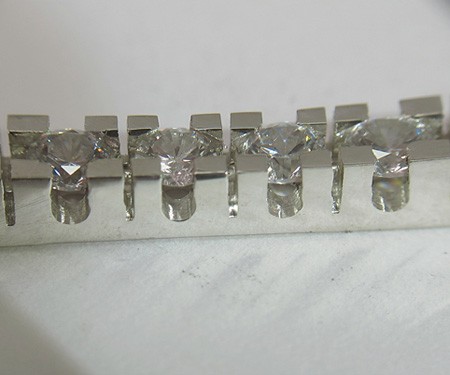
Looking somewhat untidy at this stage.
The stones have been inserted into the collets and are still loose.
When the claws are cut at the correct depth, the stone will 'click' into the collet, and does not have to be forced in.


I use a chain nose pair of pliers to close the claws.
They are narrow enough to only grip two claws at a time.

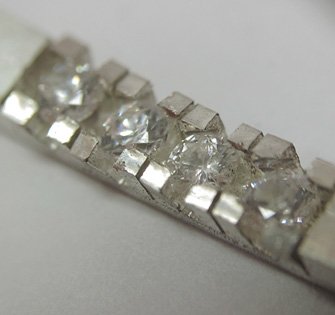
Here the claws have been bent back and the stones are tight and don't move.
Now the sides of the collets are sanded flat and the top of the claws are filed of sanded flat.
Great care must be used that the buff stick does not touch the stones during the sanding process.
A very handy tool to have is a Pumice rubber wheel.
These are like your standard rubber wheel, except that they do not scratch or damage stones.
But they remove metal very well.
They are available at the jewelry supply places in fine and coarse.


At this stage the saw with a 3/0 blade can be run through in between the collets to tidy up the dividing line.


I also use a graver just to shave the inner edges off the claws to give the a crisp straight look.
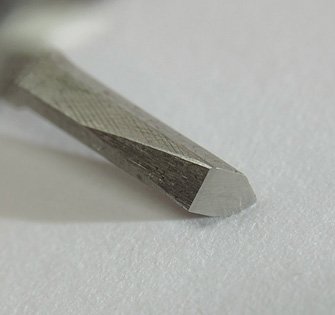

Here is a close up of the shape of my graver.
An onglette graver shape is also suitable to use.


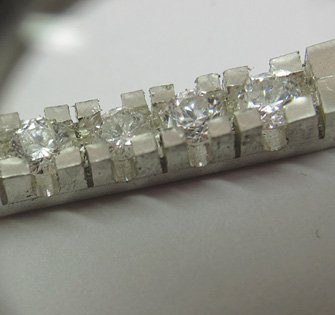
Square prong collets have been made the gemstones set and a final polish given to the jewelry piece.
This micro square style setting is used in diamonds encrusted bands and earrings.
or select other projects from Jewelry Making Tutorials List
If you have any questions or wish to be notified of any new tutorials that are posted, email me.

This content is the intellectual property of Hans Meevis. More information on our Copyright and Privacy Policy


